


Science experiments that will make your kids’ curiosity bloom
These plant-based activities will teach kids about springtime science.
According to kids news agency,Your kids aren’t the only ones who feel like they’re coming alive when spring arrives—the natural world does, too.
“Ultimately, spring is the return of the sun,” says Jack Dumbacher, curator of ornithology and mammalogy at the California Academy of Sciences.
“Sunlight is the source of fuel for the vast majority of life on Earth.” So as the northern hemisphere tilts toward the sun, it kicks off a cascade of changes.
For example, plants have something called phytochromes in their stems, leaves, and flowers. These phytochromes are activated by light and trigger a process that tells buds on branches to begin sprouting when nights become shorter.
Use these experiments to answer common questions your kids might have about the natural world during spring, like how plants make oxygen or how seeds grow. You might see your garden turn into a science lab!
See a leaf breathe—and check out photosynthesis

Those bubbles are oxygen!
You’ll need:
• Leaf (We used a nasturtium leaf.)
• Dish filled with water
• Rock
What to do: Go outside and pick a large leaf off a plant. Fill a dish with water and place the leaf inside. (You might need to use a rock to keep the leaf submerged.) Put the bowl in direct sunlight. After a few hours, you should see bubbles forming on the leaf’s surface.
Cool science: Sunlight is weaker and not as plentiful in the winter, so plants conserve their energy by entering a state called dormancy in which they drop their leaves and stop growing. But in the spring, when sunlight and water are abundant, the plants can start growing again—and their leaves help.
A chemical in the leaves called chlorophyll takes in sunlight, water through the plant’s roots, and carbon dioxide from the air. The chlorophyll recombines these ingredients to create glucose—which the plant uses for energy and to eventually make the plant’s cells—and oxygen.
The plant doesn’t need the leftover oxygen, so it expels this chemical element through the leaves. By placing the leaf in the water, oxygen exits the leaf as bubbles—photosynthesis in action. (Bonus: By seeing the oxygen we breathe come out of leaves, kids will understand why plants are so important to the environment.)
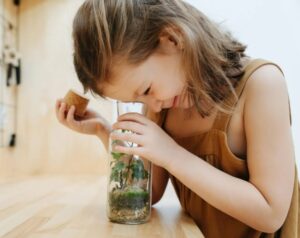
Make a mini greenhouse—and learn how seeds sprout

We used mason jars for this experiment.
You’ll need:
• Seeds (We used arugula, but you could use seeds from citrus fruit.)
• Soil
• Small container (like an old spice jar or yogurt container)
• Large clear container that will fit over the smaller container (like a large glass jar or a liter soda bottle cut in half)
What to do: Gather your seeds. (If you want to use citrus seeds, rinse off the seeds to remove any bacteria, then let them soak for 24 hours.) Fill a small container with soil and place seeds about a half inch down, then moisten the soil. Next, place the larger container on top of the smaller container and put the mini greenhouse in a sunny spot. After a few days you should see the plants start to grow.
Cool science: By covering the plant with a clear container, you’ve created a mini greenhouse that mimics warmer, humid springtime weather.
Seeds need three things to sprout: water, oxygen, and warmth. The greenhouse helps trap heat from the sun and moisture from the soil, creating the perfect microclimate to encourage seeds to germinate. When the seed coats sense that the moist soil has reached about 19˚C, it sends a signal for the seed to crack open and allow water and oxygen inside.
Once the seedlings sprout, the humid greenhouse environment helps the plants to grow. That’s because plants inhale carbon dioxide from the air through tiny holes on their leaves called stomata, which open up in humid air.
Test bee memory—and watch these animals learn

Use bowls of water plus one with sugar water to test bee memory.
You’ll need:
• Pan or microwave-safe dish
• Water
• ¼ cup sugar
• 5 clear dishes
• 4 pieces of white paper or index cards
• 1 piece of red construction paper (or paint an index card red)
What to do: Heat the sugar with a cup of water until the sugar is completely dissolved. Set aside to cool. Fill four clear dishes with regular water and place them on top of white paper. Fill the last dish with the sugar water and place it on top of your red paper. Set the dishes in a row outside.
Over the next few days, watch to see if bees come to the dishes. Which one do they fly to first? A few days after you’ve seen bees at the sugar-water dish, move the dish—along with its red card—to another spot. Do the bees follow it?
Later, switch cards so that the red card is now under a dish of plain water. What happens in the next two days? Now leave the cards where they are but switch the sugar-water dish with another dish of plain water with white paper beneath. How do the bees respond?
Cool science: During the winter, bees huddle together in a state of hibernation to survive cold temperatures. When warm weather arrives, the bees leave the hive in search of their food—nectar—which is sugary water created by plants.
Bees find food by sight and smell. They can’t see colours quite like humans can, but they can distinguish colours, patterns, and even ultraviolet light. Brightly coloured flowers (ie, the red paper) create a bull’s-eye for honeybees and other pollinators—it’s why flowers are so colourful.
Bees have great memories, so once a bee associates something with food, it’s likely to return. The buzzers will probably be drawn first to the red card but might also find the sugar water by smell, even without the red card. Watch to see if they follow the coloured paper and how quickly the bees find the new location of the sugar water.
Dissect a flower—and see how plants reproduce

Dissected and labeled flower on a board.
You’ll need:
• Index cards or paper
• Marker or pen
• Flower (We used a rose, but tulips, lilies, and daffodils also work.)
• Scissors
What to do: In the order below, separate the parts of the flower and put each one on a separate piece of paper with the correct label:
• Stem
• Sepals (the leaves that sit at the base of the petals)
• Petals
• Stamens (the pieces that look like little stems with pollen-covered tips)
• Pistil (central stalk or stalks, depending on the type of flower, that stick straight up from the base of the flower)
• Ovary (the bulb that’s left; cut it in half so you can see the flower’s eggs inside)
Cool science: Each part of the flower helps the plant survive and reproduce. The stem carries water and nutrients to the plant, the leaves produce food through photosynthesis, and the sepals protects the flower when it’s just a bud.
Brightly coloured petals and a sweet smell attract pollinating insects like bees. When the insect arrives to eat the nectar (nectar glands can be in the petals, pistils, or stamens, depending on the type of flower), some of the stamen’s pollen sticks to the bug’s hairs.
When the insect visits the next flower, the pollen rubs off on the new flower’s pistil. Eventually the pollen moves down the pistil to the ovary, which fertilises the plant’s eggs. New seeds will grow and create new flowers.
برچسب ها :
تمامی حقوق قانونی مطالب، متعلق به سایت کودک پرس میباشد .

طراحی ، راه اندازی و پشتیبانی : راهکار وب هوشمند
ارسال نظر